
Brittany Klecker is an ERP Implementer for SuiteDynamics. She enjoys analyzing current business processes and looking for ways to automate tasks and optimize time use. She also spends her time discerning how our clients operate so they can receive personalized, high-quality work. Brittany resides in Cross Plains, WI, with her daughter, Alexandra. She graduated from Edgewood College, where she obtained a Bachelor of Science Degree in Psychology.
NetSuite Case Management Set Up: How to Configure Case Statuses, Rules, Types, Priorities, and More
Your company must address issues quickly and satisfy customers to win in the marketplace. Therefore, you need to know how to properly operate your NetSuite CRM.
Customer experience is critical for every business. You must offer frictionless ways to report issues and ask questions. Otherwise, you'll lose repeat customers, and your bottom line will suffer.
We know it can be a headache to field an influx of support cases, so we want to ensure you've set your NetSuite case management system up for success. We've assembled a quick setup guide for enabling company features; setting up case tasks, priorities, types, origin types, and issues; customizing support preferences; and more. Basically, it will help you manage critical pieces of your customer relationship management (CRM) system, so the software provides the best return on your investment.
Schedule a consultation with our experts for further advise about NetSuite management.
What is NetSuite Case Management?
NetSuite Case Management is a powerful ticketing system and one of two support management options built into NetSuite’s CRM. It handles support requests submitted from external sources, such as customers.
The other CRM support management option is an internal help desk for company employees. You can enable both features simultaneously, but this guide focuses solely on the external NetSuite case management system.
General Setup
Enable Company Features
You must enable a few company features to use the NetSuite Case Management System.
Navigate to Setup > Company > Enable Features > CRM Tab. Under Basic Features, enable Customer Support and Service.

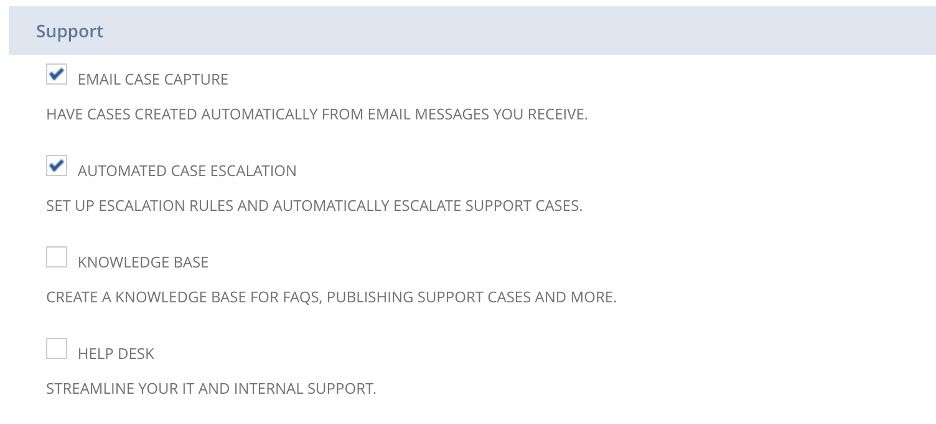
Under Support, enable the following based on your business needs:
- Email Case Capture
- Automated Case Escalation
- Knowledge Base (if you want to publish support cases)
- Help Desk (for internal help/support cases)
Now, you can customize the NetSuite Case Management system.
Setup Tasks
Case Statuses
NetSuite’s pre-configured case statuses help find cases and track their progress. You can even edit them to better suit your business. These statuses are:
- Not Started
- In-Progress
- Escalated
- Re-Opened
- Closed
To find this list, navigate to Setup > Support > Case Statuses.
You can also create a new status by navigating to Setup > Support > Case Statuses > New.

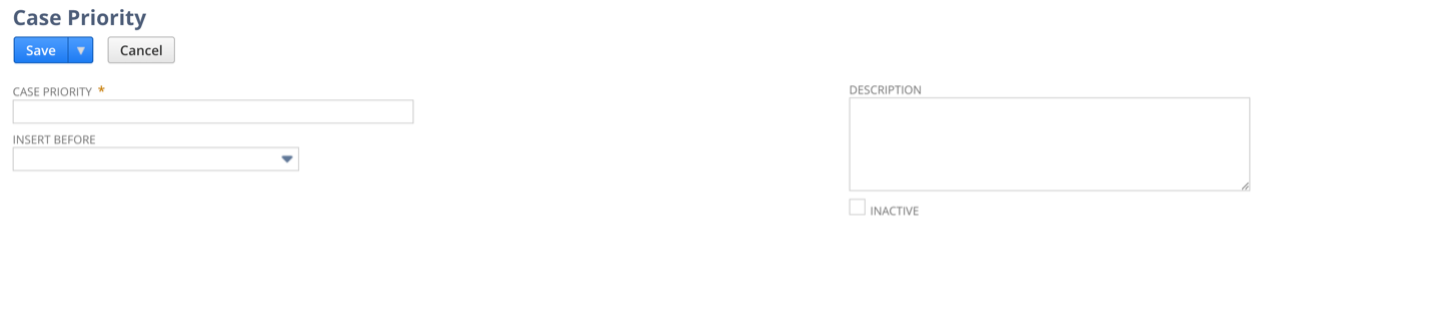
Case Priorities
True to its name, case priorities organize case management by priority status. NetSuite provides the following pre-configured case priorities.
- High
- Medium
- Low
To find the list, navigate to Setup > Support > Case Priorities.
Or create new priorities by navigating to Setup > Support > Case Priorities > New.
Case Types
Case types categorize each case by issue. NetSuite Case Management provides three pre-configured types:
- Question
- Concern
- Problem
Businesses can use them for reporting purposes and support organization. For instance, support representatives can be assigned to certain case types based on knowledge or business needs. To find them, navigate to Setup > Support > Case Types.
You can create new case types by navigating to Setup > Support > Case Types > New.

Case Origin Types
Case origin types offer details on how a case was submitted. NetSuite Case Management provides four pre-configured origins.
- Web
- Phone
- Other
Find them by navigating to Setup > Support > Case Origin Types.
Create a new case origin type by navigating to Setup > Support > Case Origin Types > New.

Case Issues
Companies generally offer support for goods and services and can use case issues to record intangible requests.
For example, a company may offer support for an item and list installation or repair as the issue. NetSuite doesn’t offer pre-configured case issues, but you can create your own by navigating to Setup > Support > Case Issues > New.

Case Management Setup
Case Profiles
You can create multiple case profiles to streamline the support management process. Think of your case profile as a team of individuals handling specific business subsets.
However, note that each case profile operates independently. For example, suppose you create a specific template with branding in one profile. That branding isn’t automatically applied to all profiles.
To create a case profile, navigate to Setup > Support > Case Profiles > New. Fill out the following fields on the General subtab.
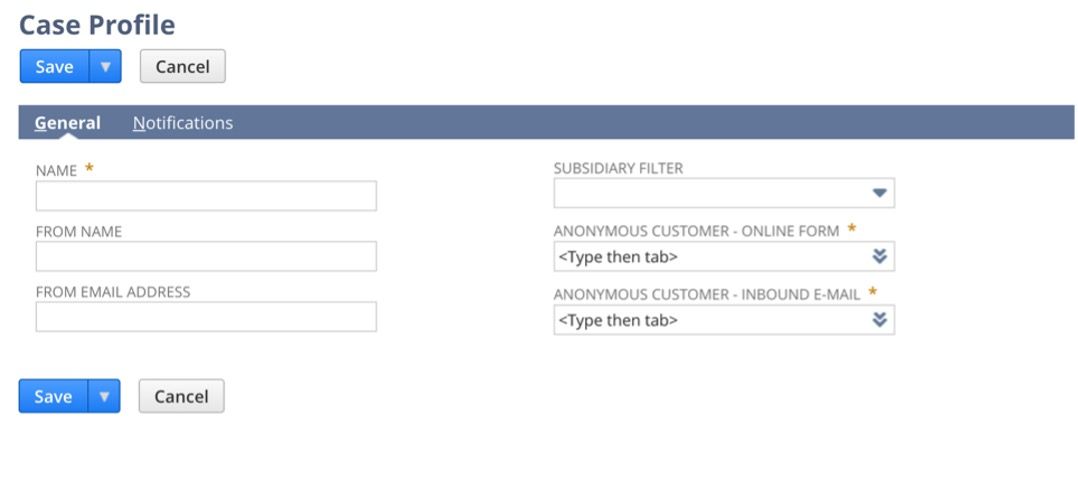
As you can see, each case profile has options to assign an email address and filter by a subsidiary.
You must also make two mandatory selections so customers can submit cases online: Anonymous Customer - Online Form and Anonymous Customer - Inbound E-mail. NetSuite Case Management uses these settings if no pre-existing customer is found in the system when a case is submitted. You can select from the dropdown lists or create your own options.
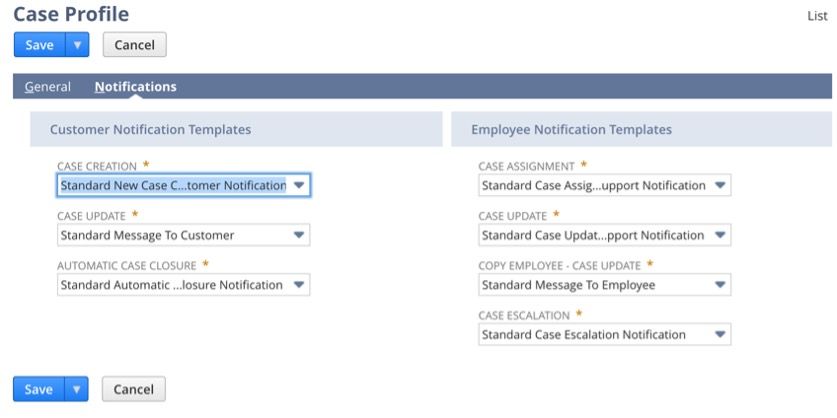
Notifications Subtab
You can select templates for certain email notifications. These templates come pre-built but can be further customized to streamline your support management process.
Case Rules
NetSuite Case Management allows users to build rules that automate case assignments to specific support groups or representatives. Case rules are assigned to case territories and based on native and custom fields.
You must create a case rule before you create a territory. NetSuite does not provide any pre-built case rules.
To view existing case rules, navigate to Setup > Support > Case Rules.
To create a new case rule, navigate to Setup > Support > Case Rules > New. You will see a list of all case rule fields you can use.
This example shows the fields you complete to create a case rule for states.
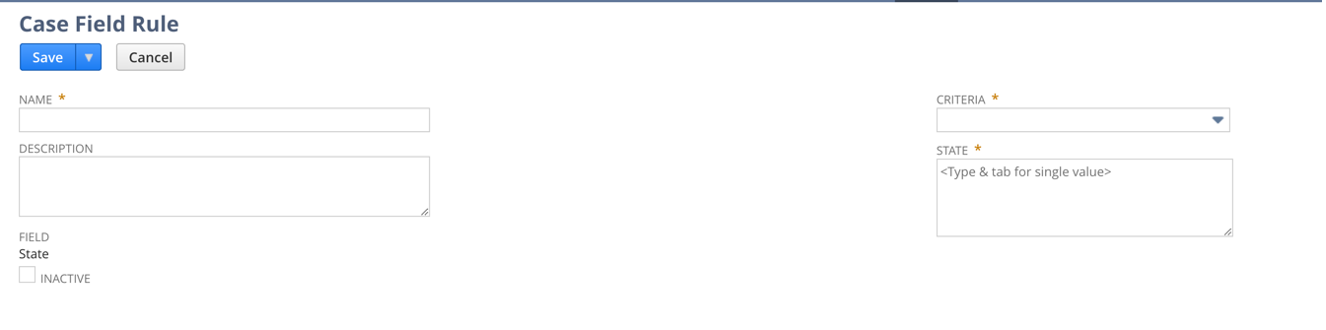
You can name your rule and select the states and criteria it applies to. Once this rule is created and saved, you can assign it to a territory and specific support representatives or groups.
Case Territories
Case territories allow users to assign rule sets to specific support groups or individual representatives. To view your current case territories, navigate to Setup > Support > Case Territories.

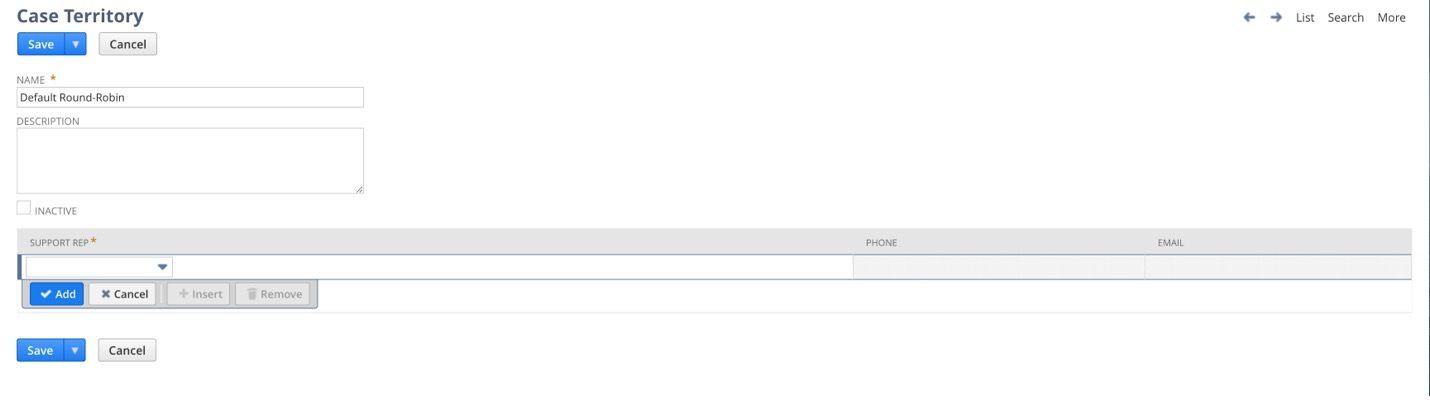
NetSuite Case Management also includes a territory called Default Round-Robin. This territory is a catch-all feature. For example, suppose a case comes through that doesn’t match any rules. In that instance, the system will assign it based on the Default Round-Robin rule.
You can go into the rule and assign a specific support representative or group to it. Yet, suppose you don’t choose an assignment within the rule. In that instance, any cases that fall outside your territories or rules will sit in the case queue, waiting to be assigned.
You can assign someone to the Default Round-Robin rule by simply editing it.
To create a new case territory, navigate to Setup > Support > Case Territories > New.
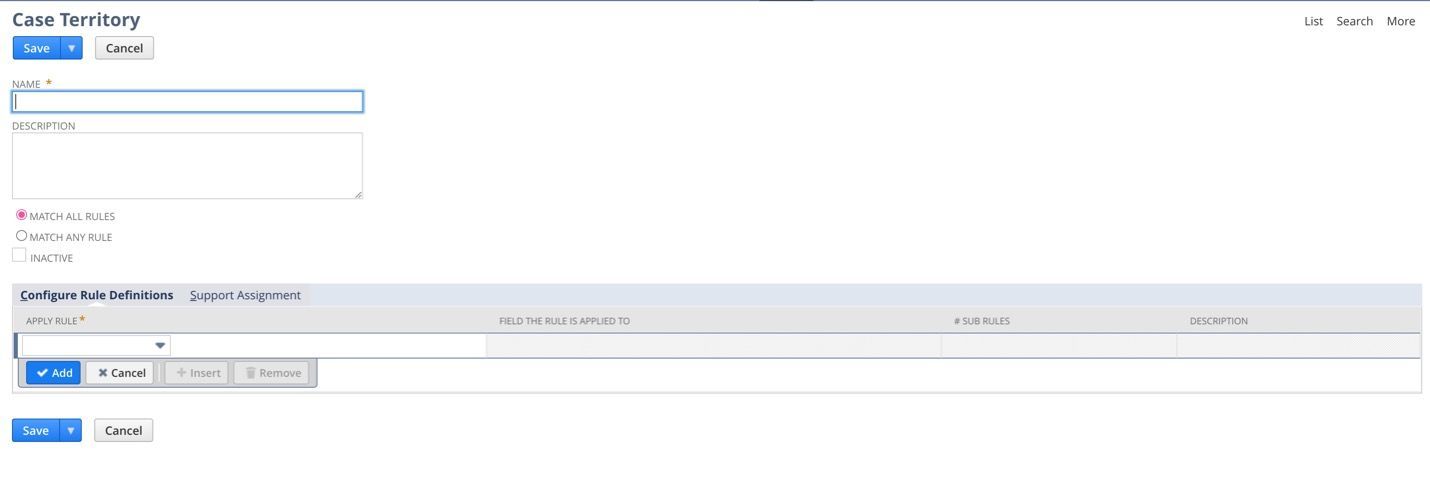
Name your case territory, and then configure the rule definitions and support assignments applied to it. Select a rule definition from a list of previously created rules. Then, under the Support Assignment subtab, select the individuals or group assigned to this territory.
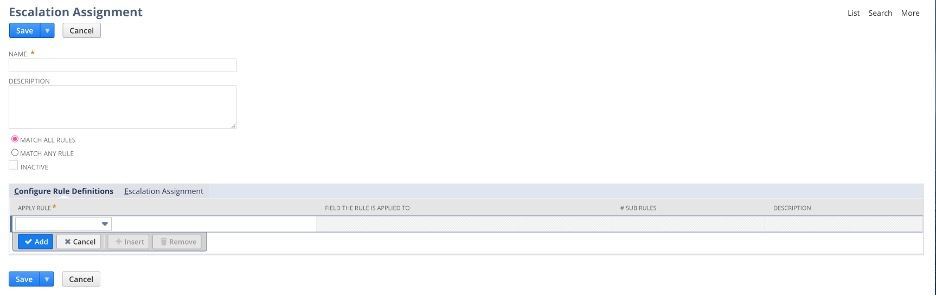
Escalation Rules
Case escalation rules help automate case assignments. For example, you can escalate certain cases based on case types, priority, etc. The escalation rules and escalation assignments are set up like rules and territories.
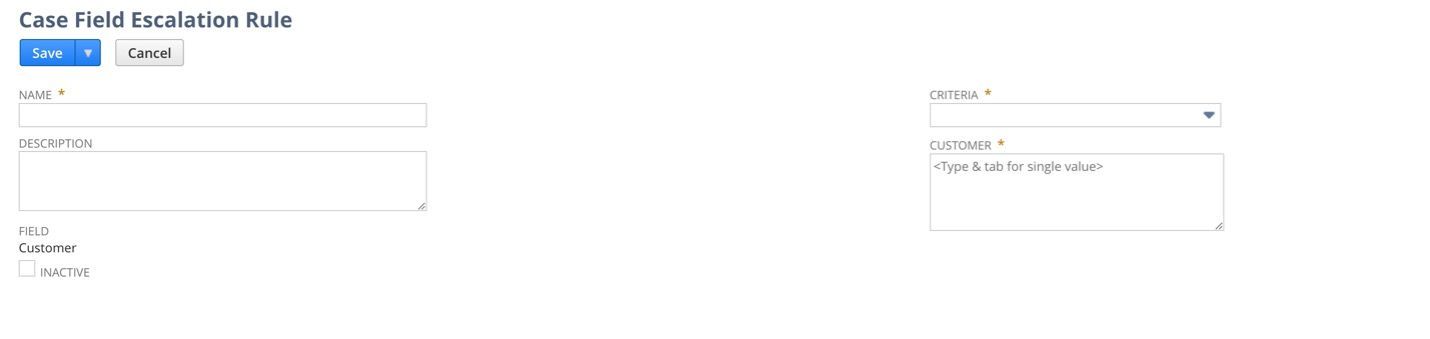
To create a case escalation rule, navigate to Setup > Support > Escalation Rules > New. Then, you will see a list of fields upon which you can base your escalation rule.
After creating a case escalation rule, assign it to a group or individuals. Navigate to Setup > Support > Manage Escalation Assignments > New.
Support Preferences
Users can customize many preferences within the NetSuite Case Management system. Preferences include:
- General
- Notifications
- External
- Inbound Email
- Ordering
You can also enable or disable them based on company use cases. However, remember to review these cases before your support management system goes live.
Navigate to Setup > Support > Support Preferences.

Employee Features
After configuring all features, preferences, and setup, designate specific employees as support representatives. Otherwise, your team members can’t work cases and utilize all the features offered.
To designate support representatives, locate the employee record for each staff member on the support management team. Then, check the
Support Rep
box on the record.
Item Features
Check the Offer Support box to select specific items on support cases. You will find it under the Preferences subtab on the item record.

Maximize NetSuite and Thrive!
A properly managed NetSuite CRM streamlines your support process and provides customers with fast service that earns their loyalty. So, you have to get the setup right.
Of course, the CRM isn't the only piece of software you need to function flawlessly. You have to format every part of NetSuite correctly to fully capitalize on your investment.
We know software can get complicated and stressful. Fortunately, there's no reason to figure it out alone. Our Managed Services packages offer thorough NetSuite training and support so your system can work like a dream. Start maximizing NetSuite and schedule a consultation today.
Frequently Asked Questions
Can NetSuite Case Management handle complex escalation workflows?
Yes, NetSuite Case Management supports sophisticated escalation workflows that can be customized to match your company's support hierarchy. The system allows you to create multi-level rules that dictate how cases flow through your process and where they go based on your defined criteria. You also have the option to manually escalate it to individuals or teams and provide case attachments. Automated notifications alert the appropriate team members when cases require higher-level attention. The workflow engine can also implement conditional logic for different escalation scenarios based on your specific business rules.
How customizable is Case Management in NetSuite?
NetSuite Case Management is designed to be highly customizable to fit a wide range of business models. Nearly everything within the case management system is customizable to fit your business support needs, which includes:
- Case forms (Custom Fields, Profile Specific)
- Custom fields (Any custom field type to support metric tracking)
- Workflows (Assignment and Routing Automation, Email Notifications, Escalations)
- Case statuses, types, and priorities
- Allows for multi-level support streams by Case Profile: (Internal, External, Subsidiary Specific, etc.)
Do Cases allow for communication and activity tracking?
NetSuite’s case management system logs all related activities, including:
- Phone Calls
- Events
- Internal Notes
- Attachments
- Incoming and Outgoing Emails
All activities associated with a case are logged within the case record under the activities tab. This ensures anyone working on the case can access its details and history.
Does NetSuite’s Case Management module support external case submissions?
Yes. NetSuite allows support tickets to be submitted by external users, such as customers and vendors, without requiring direct access to NetSuite. The following are ways a case can be submitted externally:
- Web Forms: A web form available to the public can capture case details and create a support ticket (Case) within NetSuite. This web form can be built within NetSuite or even integrated from an external website.
- Email Capture: NetSuite can be configured to automatically create cases from incoming emails sent to a designated support address.
- Customer Center Portal: If customers have login access to the Customer Center, they can create, view, and manage their own support cases through the Customer portal.
Does NetSuite’s Case Management module support departmentalized ticketing?
Yes, NetSuite’s case management module allows users to set up distinct ticketing processes for different business units. Each unit can also customize its own workflows, escalation management, teams, and data requirements.
- Case Profiles: Case Profiles are templates that define default values and behaviors for different types of cases. Each department can use a unique case profile to predefine case type, status, priority, form layout, and assignment rules.
- Custom Case Forms: Each profile can be tied to a specific form with department-specific fields, labels, and layouts, tailored to each team or business unit.
- Email Capture & Assignment Rules: Separate support email addresses can be mapped to specific case profiles, automatically assigning cases to the correct team.
- Dashboards & Reporting: Teams can build dashboards filtered by case profile, allowing for independent performance tracking and reporting.


Job shop manufacturing is a production strategy focused on customization over volume.

The future of manufacturing planning is in systems designed to flex and reflect how work actually happens in job shops with tools like Dynamic Job Shop.

Explore Esusu's partnership with SuiteDynamics to enhance financial processes. Schedule a consultation to see how your business can thrive with NetSuite solutions.

Spreadsheets built modern business. For decades they served as the unofficial operating system of job shops and custom manufacturers everywhere. They are flexible, familiar, and just comfortable enough to feel like a real solution. In the early days of a growing shop, they genuinely work. But as make-to-order complexity increases, as custom BOMs multiply, lead times tighten, and engineering revisions pile up, spreadsheets strain under the pressure. Every job is different, but spreadsheets want everything to be the same. In make-to-order environments, no two jobs are identical. Unique BOMs, custom routings, variable material costs, different setup requirements, customer-specific specs. Spreadsheets, though, thrive on repetition and standardized rows. So the more variation you introduce, the more tabs you create. The more exceptions you add, the more manual overrides appear. The more formulas you patch together, the more fragile the whole thing becomes. Eventually, the file turns into something only one person truly understands. That’s a liability, not a system. Capacity becomes a guessing game. In make-to-order shops, capacity isn’t theoretical. It’s constrained by reality. Machines go down. Operators vary in skill. Setup time fluctuates from job to job. Rush orders blow up carefully planned weeks. Spreadsheets struggle here because they’re built on static inputs. You can build a beautiful planning sheet with machine-hour allocations, but unless it dynamically adjusts for real-time job status, operator availability, overlapping resource conflicts, and maintenance downtime, you’re not really planning. You’re forecasting best-case scenarios. And that’s exactly how shops overpromise delivery dates and end up paying for it later in overtime and expediting costs. Engineering changes don’t cascade cleanly. Change is a constant in make-to-order manufacturing. A customer tweaks a dimension, a material substitution becomes necessary, or a tolerance tightens halfway through production. In an integrated system, that change automatically updates BOMs, routings, cost projections, and scheduling impact all at once. In a spreadsheet environment, it depends entirely on who remembers to update which tab. A routing might change without adjusting the labor estimate. A material substitution might never feed into the margin calculation. A lead-time adjustment might not reach the production schedule until it’s too late. These small disconnects multiply quickly, and because spreadsheets have no enforced relationships between data sets, the errors don’t announce themselves. Institutional knowledge becomes a single point of failure. Ask most growing job shops who owns the master spreadsheet and you’ll get a name. One estimator, planner, or operations manager who has become the living interpreter of years’ worth of embedded formulas, assumptions, and logic that nobody else fully understands. This works fine until it doesn’t. When that person goes on vacation, gets sick, or leaves, the shop loses operational clarity. In an environment already defined by complexity, having critical knowledge live inside one person’s mental model of a file is an inefficient bottleneck. Visibility stops at the file boundary. Spreadsheets are static snapshots. Make-to-order manufacturing is anything but. Without real-time feedback loops, shops find themselves unable to answer questions that should be simple: Are we actually on track this week? Which jobs are consuming more labor than quoted? Where is the bottleneck right now? Which customers consistently drive margin compression? When performance data doesn’t flow automatically from the floor back into quoting and planning, improvement stalls. You can’t refine what you can’t see. Here’s the thing about spreadsheet failure in manufacturing… it’s not dramatic. It’s gradual. First the files get slow, then fragile, then opaque. By the time leadership feels the real pain through late shipments, squeezed margins, and rising overtime, the architectural issues are widespread. Make-to-order manufacturing demands systems that understand relationships: how a routing affects capacity, how a BOM revision affects cost, how a delayed job cascades through the rest of the schedule. The question most shops ask is whether they can make the spreadsheets work. The better question is what it’s actually costing to keep them. The most resilient make-to-order manufacturers are building systems that preserve flexibility without sacrificing the visibility needed to actually run the business. Adaptability is the advantage.

In custom manufacturing , when systems break down, profit rarely disappears all at once. It leaks. Quietly, repeatedly, and often in ways that never show up clearly on any report. Walk into almost any fabrication shop and you’ll hear some version of the same story: the backlog is strong, revenue looks good, we’re staying busy. And yet the margin feels thinner than it should. For job shops running custom work, profitability doesn’t usually collapse because of one bad decision. It erodes through small, daily inefficiencies buried inside quoting, scheduling, engineering changes, and the gap between what was planned and what actually happened on the floor. Here’s where shops most commonly lose efficiency, and how to get it back. The quote that was almost right. For custom orders, every quote is a prediction, and predictions are dangerous when they’re disconnected from real shop-floor data. Outdated labor standards, underestimated setup time, material prices that changed since the template was built, and capacity assumptions based on average weeks instead of current reality. These errors are each small on their own, but a 4% underestimate on labor here, a missed secondary operation there, add up across hundreds of jobs. Small errors compound into real margin loss. The best-performing shops treat quoting as a living system fed by actual job performance data, not static spreadsheets that nobody updates. Capacity that looks available but isn’t. On paper, there’s open space on the schedule. In practice, that open week includes a machine down for maintenance, a senior operator on vacation, two complex jobs already competing for the same bottleneck, and a rush order someone verbally committed to last Thursday. Without finite capacity planning, shops routinely overcommit based on theoretical machine hours rather than real-world constraints. The fallout is predictable: overtime spikes, expedited shipping costs, re-sequencing chaos, and exhausted operators. Margin shrinks not because the shop is incapable, but because it’s planning in averages. Engineering changes that never get repriced. Designs evolve. A hole moves, a weld spec changes, or a tolerance tightens. Each adjustment has a cost. But many shops hesitate to reprice midstream, worried about damaging the customer relationship, and end up absorbing the extra labor and rework time instead. Do this enough times and it becomes a cultural norm: “we’ll just take care of it.” That’s margin erosion disguised as good service. High-performing job shops track engineering change impact in real time and make repricing decisions based on data rather than discomfort. Setup time hiding in plain sight. In low-volume, high-mix environments, setup time is often the silent killer. When shops don’t track setup separately from run time, assume it’ll all come out in the wash, and never refine their routings based on what actually happened, they end up underpricing complexity. In job shops producing one to fifty unit runs, setup can represent a disproportionate share of total labor. If it isn’t measured accurately, it can’t be priced accurately. The spreadsheet layer nobody talks about. Most shops run a hybrid environment where the ERP handles transactions and spreadsheets handle reality. Capacity lives in one file, quoting assumptions in another, and actual job performance in someone’s head. This creates invisible disconnects. Quotes not aligned with current routing, schedules that don’t reflect real constraints, and historical performance that never feeds forward into better decisions. Each disconnect feels manageable in isolation. Collectively, they create margin leakage that leadership can feel but can’t quite locate. What makes all of this so frustrating isn’t that shop owners don’t care. It’s that they can’t see clearly enough to act decisively. Without integrated visibility across quoting, routing, capacity, and quality, operators run on instinct. And instinct works remarkably well until scale and complexity outpace it. The shops that consistently outperform aren’t necessarily the biggest or the busiest. They operate with clarity and consistency. Fewer assumptions and more decisions based on reality. In a manufacturing landscape where lead times keep shrinking and customers expect speed and precision at the same time, margin won’t be protected by effort alone.

Every manufacturing leader has lived this moment: The schedule looks perfect. Orders are slotted. Commitments are made. And then reality shows up. A machine goes down. A key operator calls out. Setup times balloon. One late job cascades into five. Suddenly the plan (built meticulously inside your ERP) falls apart. Not because your team failed, but because the plan was never grounded in reality to begin with. The Hidden Lie Inside Most ERP Schedules

NetSuite’s Model Context Protocol (MCP), built in partnership with Anthropic, helps users leverage AI

Uncover the challenges of data quality affecting DIO accuracy, from ghost inventory to inconsistent formats. Find out how to tackle these issues effectively with a NetSuite ERP.

In the world of private equity, creating operational value has become increasingly critical as the market evolves. With exit timelines extending and competition for deals intensifying, PE firms are looking beyond financial engineering to drive returns. One emerging strategy that's gaining traction is the consolidation of NetSuite instances across portfolio companies. The Hidden Challenge of System Fragmentation As PE portfolios grow through acquisition, a common pattern emerges: multiple portfolio companies operating on separate NetSuite instances. While each system may work effectively in isolation, the fragmentation creates significant operational inefficiencies at the portfolio level: Redundant Licensing Costs: Each separate instance requires its own licensing structure , creating unnecessary expenses that directly impact EBITDA. Manual Consolidation Effort: Finance teams spend countless hours extracting, transforming, and manually consolidating data from disparate systems. Inconsistent Processes: Basic business functions are handled differently across portfolio companies, limiting standardization efforts. Limited Portfolio-Wide Visibility: Gaining insight across the entire portfolio requires extensive manual effort, delaying strategic decision-making. Integration Challenges: Onboarding new acquisitions becomes increasingly complex when each company maintains its own environment.

Backorders disrupt revenue and frustrate customers. Learn what "backordered" means, how backorders happen, their impact on businesses, and how NetSuite ERP can minimize the issues.
