Grace Martin is the Principal Finance Consultant at SuiteDynamics and possesses a unique dual expertise in both technology and finance. Her extensive experience spans virtually every financial position from auditor to CFO, complemented by her management of IT departments and leadership of multiple system implementations. She also spent nine years as a contract accountant and systems analyst for major manufacturing plants and ten years as Director of Finance and Management Information Systems at Dippin Dots, with roles as Controller and Global Cost and Pricing Analyst at Siemens Rail. At SuiteDynamics, Grace specializes in developing custom financial solutions that enhance native NetSuite functionality, with a personal focus on understanding client financial needs and ensuring correct GL impact for reporting.
A Comprehensive Guide to Reconciling a Credit Card Statement in NetSuite
NetSuite makes accounting and bookkeeping a breeze—once you know how to use the software.
Every successful NetSuite ERP implementation includes a staff who knows how to use the software. As a company, you must be able to perform tasks within the system to make your investment worthwhile.
We know it’s frustrating to stumble through every tab and field in your ERP, trying to complete simple functions. The SuiteDynamics team has developed comprehensive NetSuite tutorials to guide you through the system and toward digital transformation.
Read our step-by-step instructions below and learn how to reconcile a credit card statement in NetSuite. Then, schedule a consultation with us to discuss a more in-depth NetSuite training program that ensures your team has the knowledge it needs to maximize the system.

Exploring NetSuite's Bank Data Matching and Reconciliation
Before we discuss how to reconcile a credit card statement, let’s cover NetSuite’s Bank Data Matching and Reconciliation feature. It’s one of the system’s standout tools.
Bank Data Matching and Reconciliation simplifies and enhances the process of matching and reconciling bank transactions with your financial records. Automating these tasks significantly reduces manual effort and minimizes human error risk. Here's how it operates.
Bank Statement Import
NetSuite allows users to import bank statements directly into the system. This feature also accommodates various file formats to align with your bank's requirements.
Transaction Matching
The system intelligently matches imported bank transactions (such as payments, invoices, sales orders, and more) with existing financial data within NetSuite.
Rule-Based Matching
NetSuite allows customers to establish rules and preferences for transaction matching. Users can define rules tailored to specific bank accounts or transaction types.
Auto-Matching
The system uses predefined rules to automatically match transactions, saving time and reducing the necessity for manual intervention.
Manual Reconciliation
NetSuite also offers an intuitive interface for manual bank reconciliation, which you can use when automatic matching isn’t possible. This interface provides real-time visibility into unmatched transactions.
SuiteDynamics experts can explain more about the Bank Data Matching and Reconciliation feature during your custom NetSuite training. We’ll ensure your team understands the system’s components and knows how to boost efficiency and productivity using NetSuite tools.
How to Reconcile a Credit Card Statement in NetSuite
Follow the steps below, and you'll see why NetSuite’s Bank Data Matching and Reconciliation feature is helpful for reconciling a credit card statement.
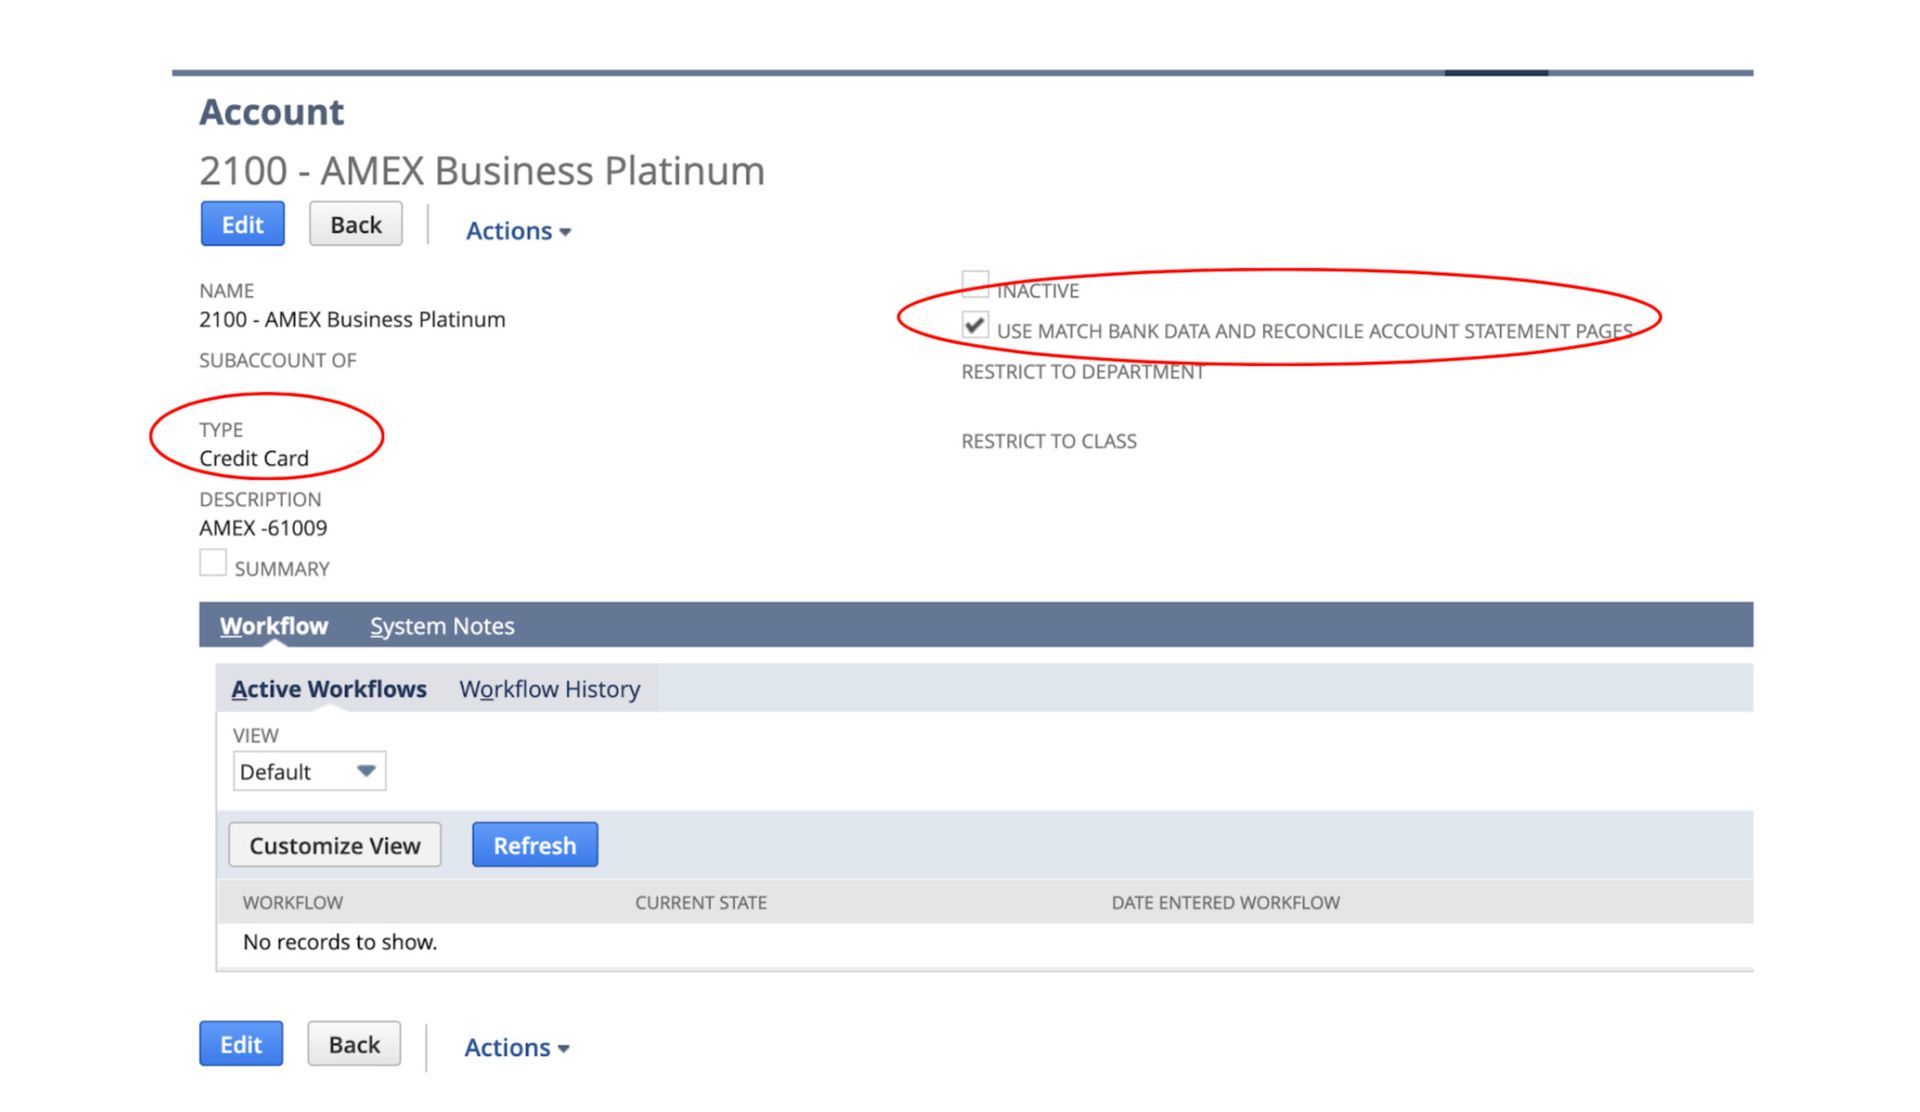
- Create a liability account for AMEX.
- Select “Credit Card” for Type.
- Check the box for Use Match Bank Data and Reconcile Account Statement Pages.
2. Connect AMEX for automatic transaction import.
- Navigate to Setup>Accounting>Financial Institution. (See our tutorial on setting up bank and credit card feeds in NetSuite.)
3. Export the credit card statement in .pdf and Excel.
4. In Excel:
- Add a column for the GL Account.
- Sort by Description (vendor).
- Assign GL codes to transactions by vendor.
- Develop standards. You can often do a VLookUP once the standards are set.
- Check for purchase orders written for transactions or bill payments already entered into NetSuite as credit card payments. If you find any, those transactions are excluded from the pivot table.
- To enter in detail, see our guide to credit card processing.
- To enter as a summary transaction, create a pivot table by GL Code and sum on Amount.
- Ensure the transaction total in Excel equals the statement balance.
5. Enter the totals by GL Code from the pivot table into NetSuite. Navigate to Transactions>Bank>Use Credit Card.
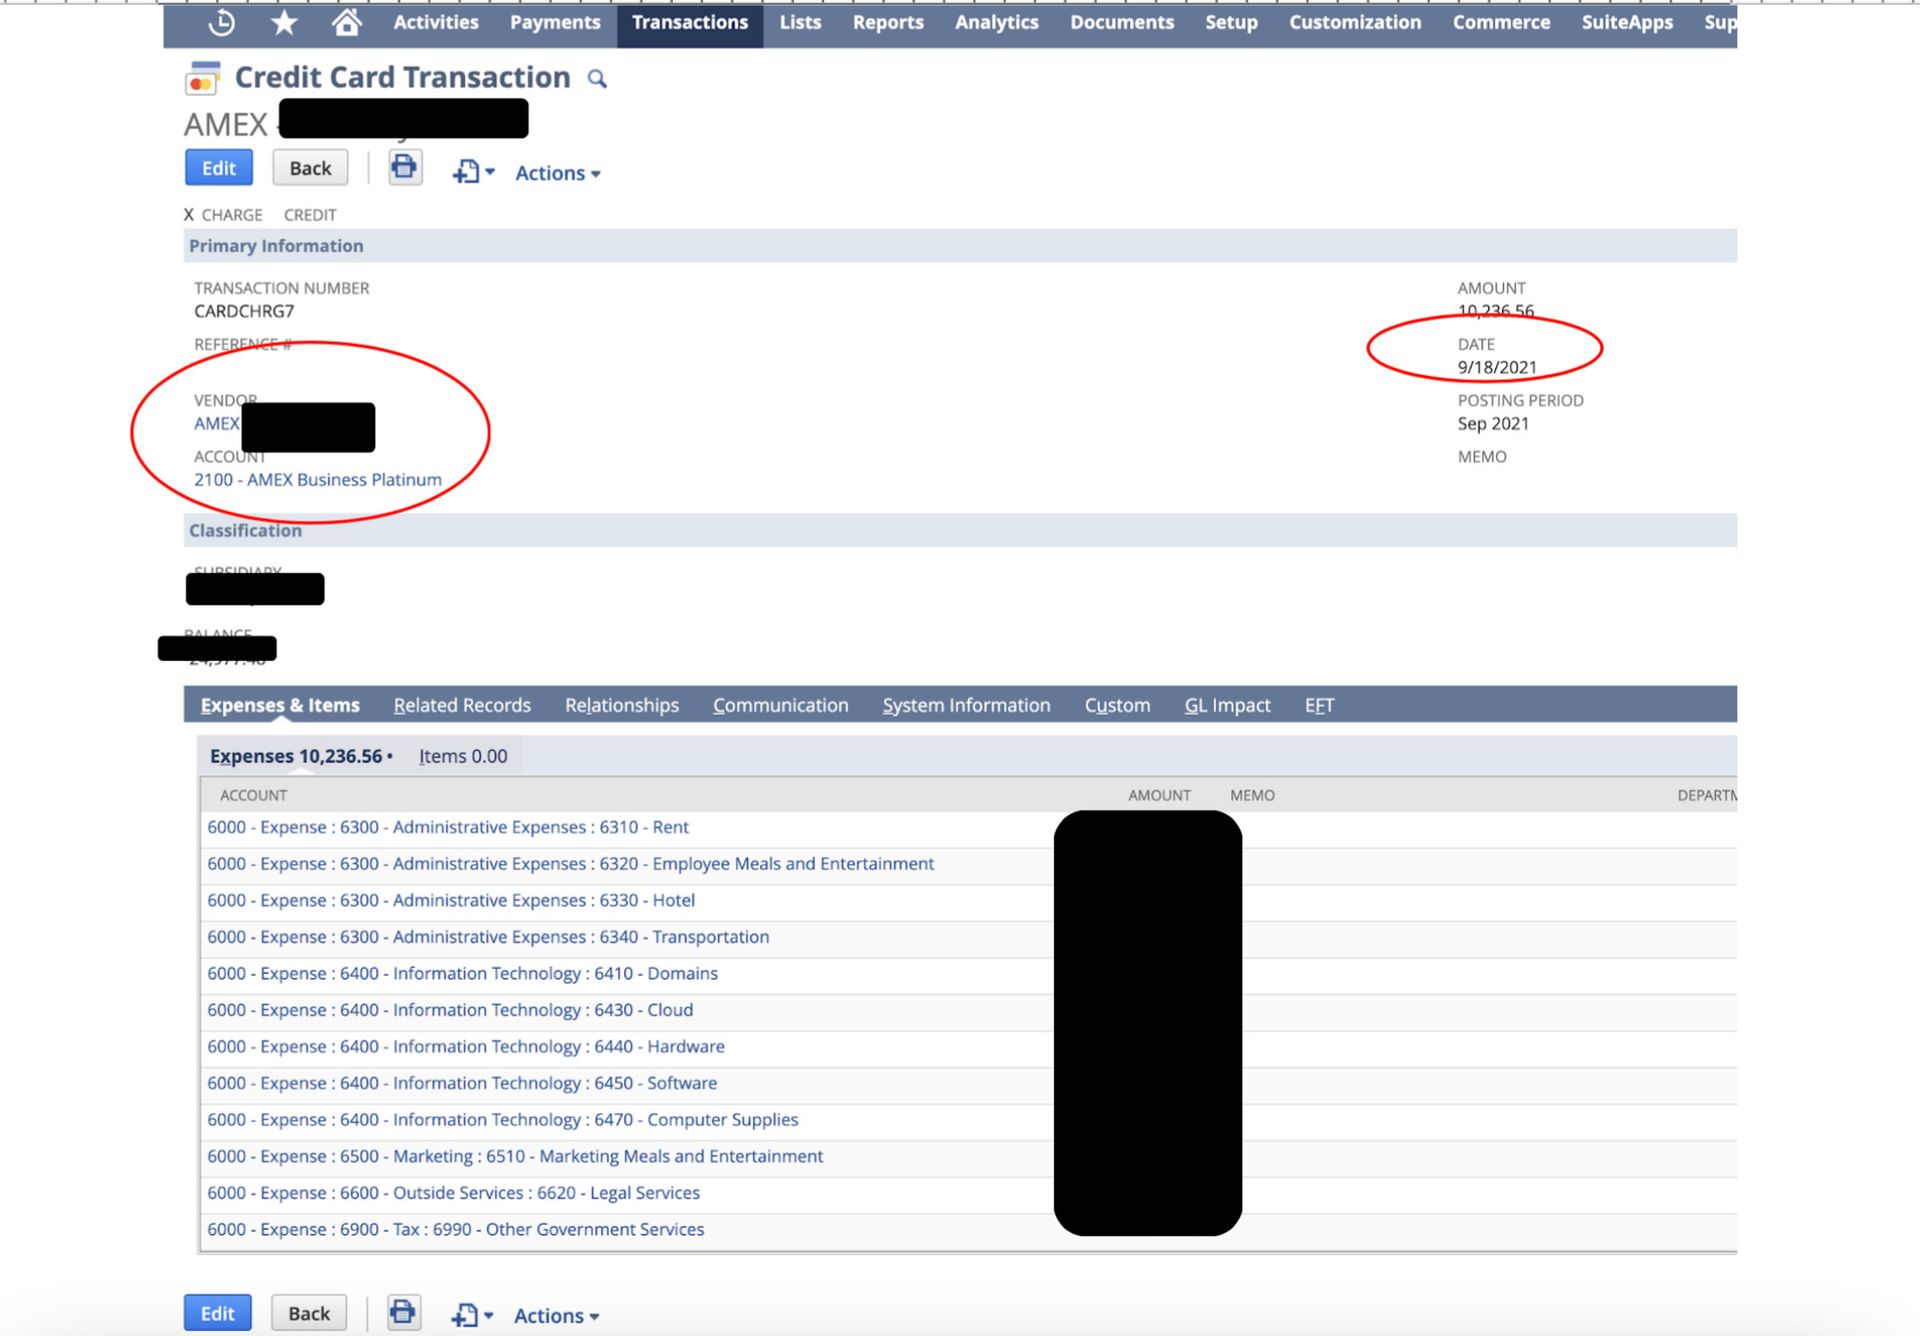
Note: The Vendor is “AMEX.” The Account is the “AMEX Liability Account.” The Date is the last day of the period and NOT the Due Date. (This is required for the expense to post in the period experienced.)
6. When payment is due:
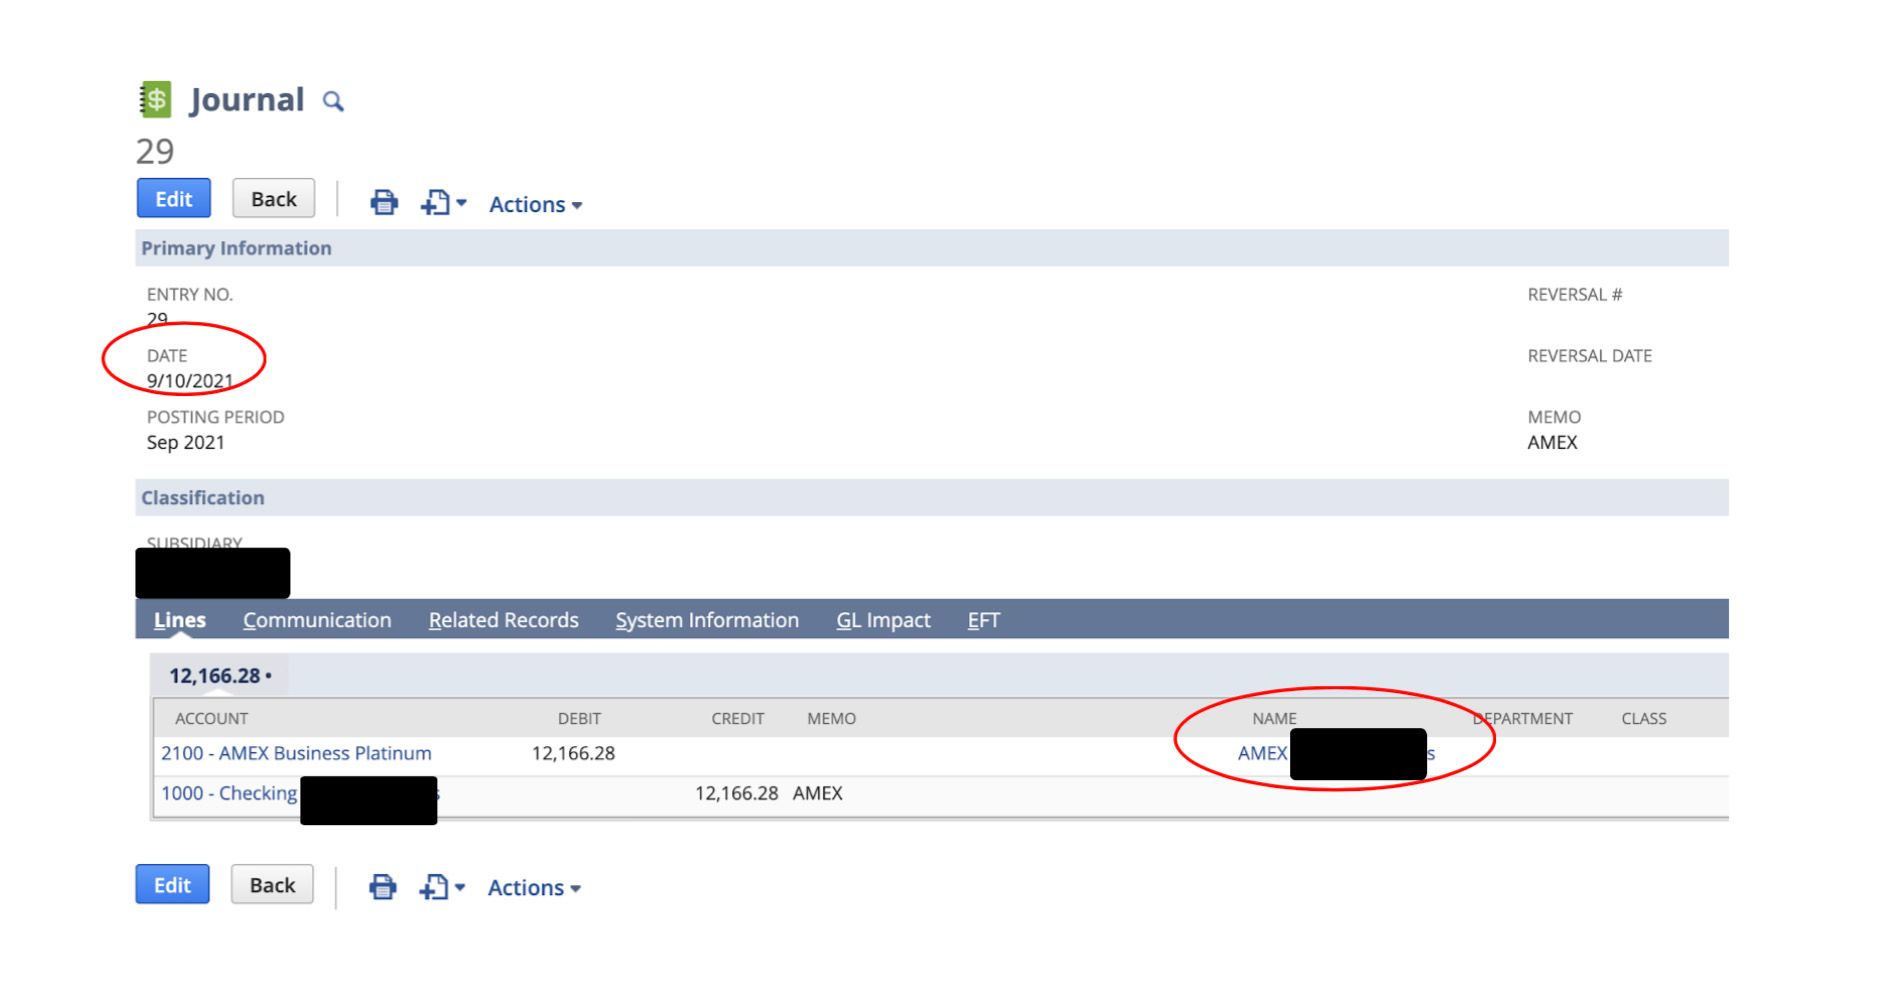
- Create a Journal Entry.
- The Date is the Due Date.
- Debit the AMEX liability account. The name is AMEX + vendor name. (This is required to post correctly.)
- Credit Cash Account.
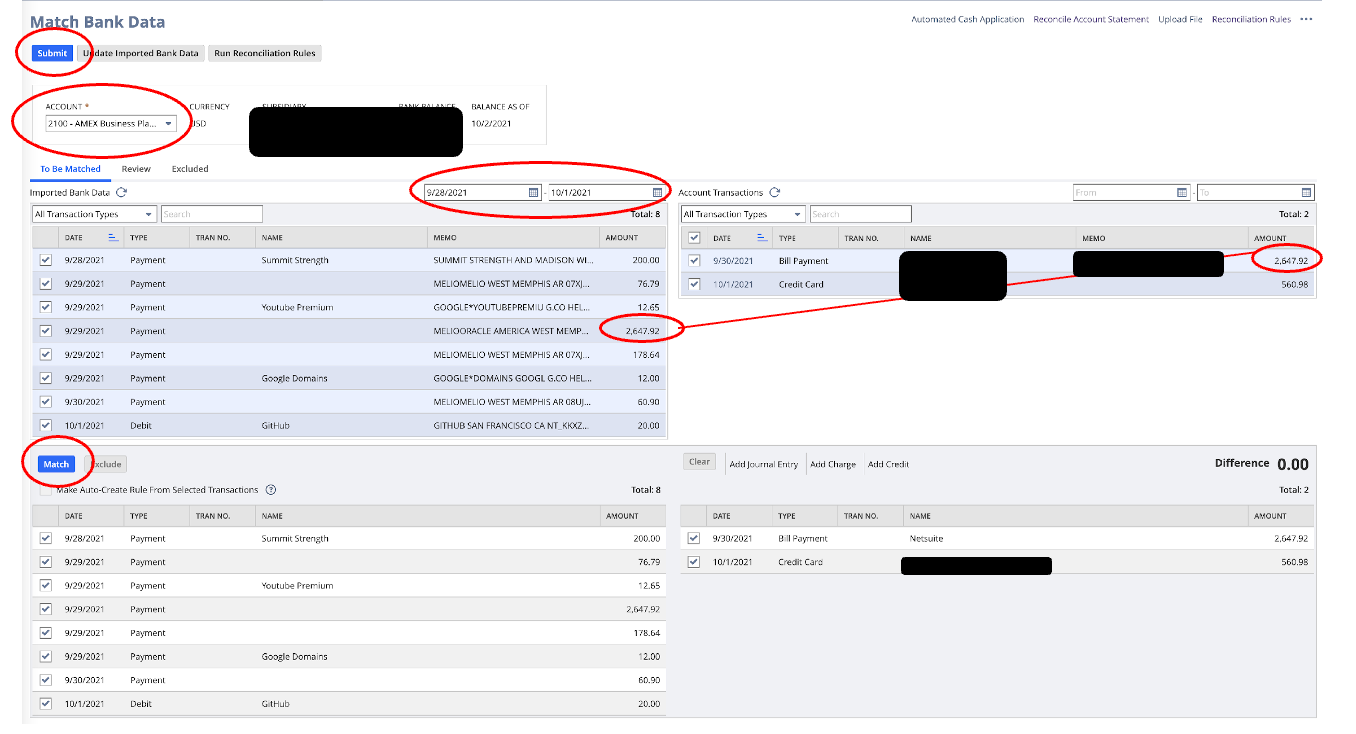
7. Match Bank Data.
- Navigate to Transactions>Bank>Match Bank Data.
- Choose the AMEX Liability Account.
- Enter the desired date range (from the credit card statement).
- The imported daily transactions appear on the left, and the transactions entered directly into NetSuite appear on the right.
- Match the transactions by checking the box. Bill payments will match one-to-one. The remainder will be multiple transactions matched to the summary entry entered from the credit card statement.
- When all transactions are matched, the difference at the bottom will be zero. Click Match in the bottom left quadrant.
- Click Submit on the top left of the screen.
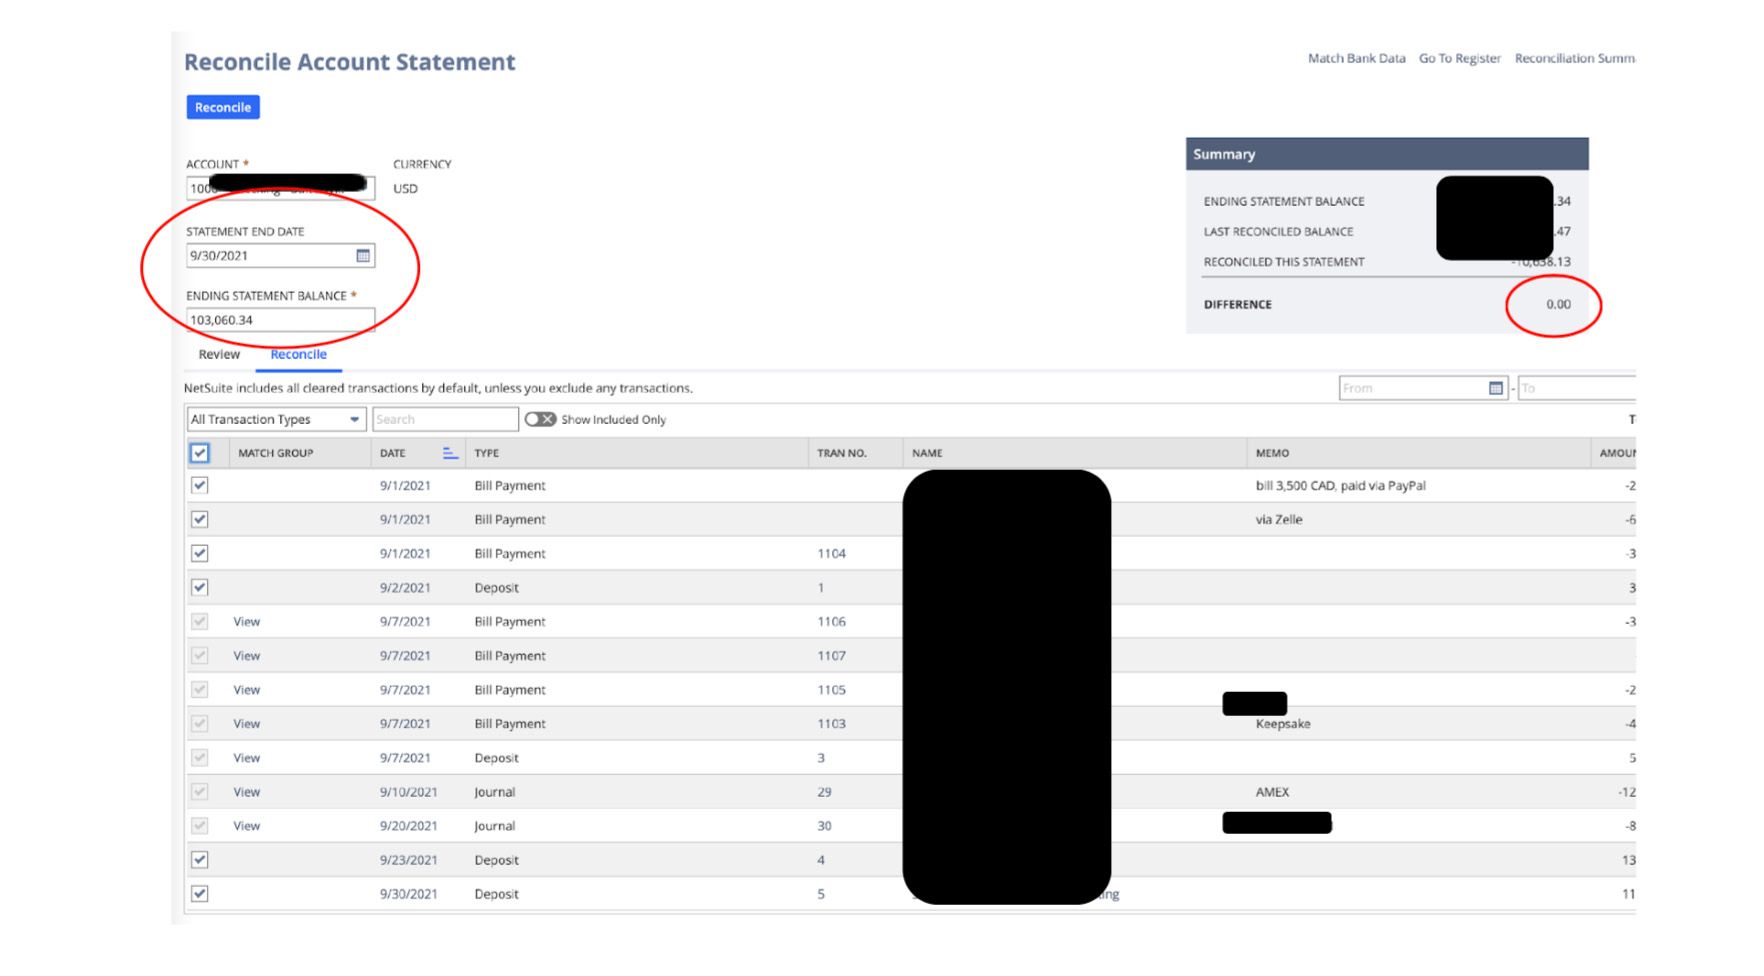
8. Reconcile the statement.
- Navigate to Transactions>Bank>Match Bank Data.
- Choose the AMEX Liability Account.
- Click Reconcile Account Statement at the top right of the screen.

d. Enter the Statement End Date and Ending Statement Balance.
e. Check all transactions to clear. Checking the box in the header line will automatically check all transactions.
f. When the difference equals $0, click Reconcile.
If you have more questions about the Bank Data Matching and Reconciliation feature or other NetSuite tools, schedule a consultation with SuiteDynamics experts to discuss a custom training program. We’ll fill in your employees’ knowledge gaps so they can operate NetSuite confidently.
Empower Your Staff with NetSuite
A NetSuite ERP can feel intimidating at first. It’s a massive system with a million moving parts, and it seems impossible to master. But trust us, it’s not.
We know your staff wants to conquer this system, and SuiteDynamics experts are ready to help them do it.
Our training programs cover everything from bank reconciliations to
dashboard customizations.
We know you’ve got the right team to run NetSuite successfully. Let us prove it to you.
Frequently Asked Questions
Does NetSuite allow me to set up auto-matching rules?
Yes, NetSuite does allow you to set up auto-matching rules. These rules are part of NetSuite's bank reconciliation functionality and help automate the process of matching transactions.
With NetSuite's auto-matching capabilities, you can:
- Create custom rules that automatically match bank transactions with corresponding transactions in your NetSuite system.
- Set specific criteria for matching, such as amount, date range, and transaction type.
- Reduce manual reconciliation work by having the system identify probable matches.
- Streamline your month-end close process through automated matching.
To set up auto-matching rules in NetSuite, you would navigate to the reconciliation rules module and configure the matching preferences based on your organization's needs. These rules can be tailored to different bank accounts and transaction types.
The auto-matching functionality helps improve accuracy while significantly reducing the time your accounting team spends on reconciliation tasks. This allows your employees to focus on more strategic financial activities instead.
Will NetSuite automatically post customer deposits?
Yes, NetSuite can automatically post customer deposits through the proper configuration of its automatic cash application module. When set up correctly, the platform will create and post customer deposit transactions upon payment receipt and can automatically apply these deposits to invoices based on predefined rules.
This automation typically works through payment gateway integrations or bank feeds that import transaction data. NetSuite matches incoming payments against open transactions and posts them according to your configured settings.
For effective implementation, you must configure appropriate payment methods, set up necessary integrations with payment processors or bank feeds, and define deposit allocation rules. Organizations implementing these automated processes typically see reduced manual data entry, faster cash application, and improved financial reporting accuracy.
Does NetSuite have a limit on the number of bank accounts you can integrate?
Yes, NetSuite limits the number of bank accounts you can integrate to 20 per instance.
While you can set up multiple bank accounts within your NetSuite environment, you can only establish direct bank feeds or automated connections with up to 20 accounts. This limitation applies to the standard NetSuite banking integration capabilities.
Is there a workaround if you exceed that limit?
Yes, there are several workarounds if you exceed NetSuite's 20 bank account limit for integration:
- Use CSV imports: You can manually download transaction data from additional bank accounts and import it into NetSuite using CSV files. While this requires more manual effort, you can bring in data from unlimited accounts.
- Third-party integration solutions: Several NetSuite partners offer banking integration tools that can overcome the native limit. These specialized solutions can expand your connection capabilities beyond the standard 20 accounts.
- Rotate active connections: If you don't need real-time data from all accounts simultaneously, you can rotate which accounts are actively connected based on your reconciliation schedule.
- Custom integration: For organizations with significant requirements, a custom integration using NetSuite's API can be developed to handle additional bank connections beyond the standard limit.
- Bank account consolidation: In some cases, organizations might consider consolidating certain banking activities to reduce the number of accounts requiring direct integration.
The best approach depends on your needs, transaction volumes, and available resources. Many organizations with complex banking structures use a combination of these methods to manage their banking data effectively in NetSuite.
If my bank security won’t allow the native NetSuite bank integration, can I get my bank data into NetSuite?
Yes, there are several ways to get your bank data into NetSuite if your bank's security won't allow the native integration:
- Manual CSV imports: You can download transaction data from your bank's online portal as CSV files and import them directly into NetSuite. While this requires manual steps, it works with virtually any bank.
- Third-party integration providers: Several specialized services can bridge the gap between high-security banks and NetSuite. These providers often have additional security protocols that may satisfy your bank's requirements.
- Bank statement uploads: NetSuite allows you to manually upload electronic bank statements (BAI, OFX, QBO formats) into the system for reconciliation purposes.
- Custom API integration: For organizations with technical resources, a custom integration using your bank's API (if available) and NetSuite's web services can be developed to create a secure connection that meets your bank's security standards.
Most organizations with strict bank security requirements find that combining CSV imports and scheduled reconciliation processes provides a practical solution until more automated options become available.

We pull information from NetSuite material, SuiteDynamics experts, and other reliable sources to compose our blog posts and educational pieces. We ensure they are as accurate as possible at the time of writing. However, software evolves quickly, and although we work to maintain these posts, some details may fall out of date. Contact SuiteDynamics experts for the latest information on NetSuite ERP systems.
Part of this text was generated using GPT-3, OpenAI’s large-scale language-generation model. After generating the draft language, our team edited, revised, and fact-checked it to ensure readability and accuracy. SuiteDynamics is ultimately responsible for the content of this blog post.